
개요

마이크로서비스 개념이 발전하기 전, 대부분의 웹 기반 애플리케이션은 모놀리식 아키텍처 형태로 개발되었다.
MSA는 작은 서비스들의 느슨한 결합 형태로, 책임 영역을 보다 적게 가지면서 적은 코드 베이스 관리와
쉬운 배포, 장애 격리, 서비스별 적절한 scaling 등의 장점으로 많은 기업에서 MSA를 사용하고 있다.
프로젝트 구조
요즘은 아무래도 IT업계에서는 쿠버네티스를 사용해 MSA를 구축하는 사례들이 많은 것으로 알고 있다.
하지만 쿠버네티스를 사용해 처음 학습하기에는 너무 오래 걸리고,
어려워서 혼자 공부하기가 부담스러운 부분이 있다.
그래서 우선은 좀 더 개발하기가 쉽고 익숙한 Spring boot 기반의
Spring Cloud 프레임워크를 사용해 구현해보고자 한다.
구현할 아키텍처는 다음과 같이 구상해보았다.
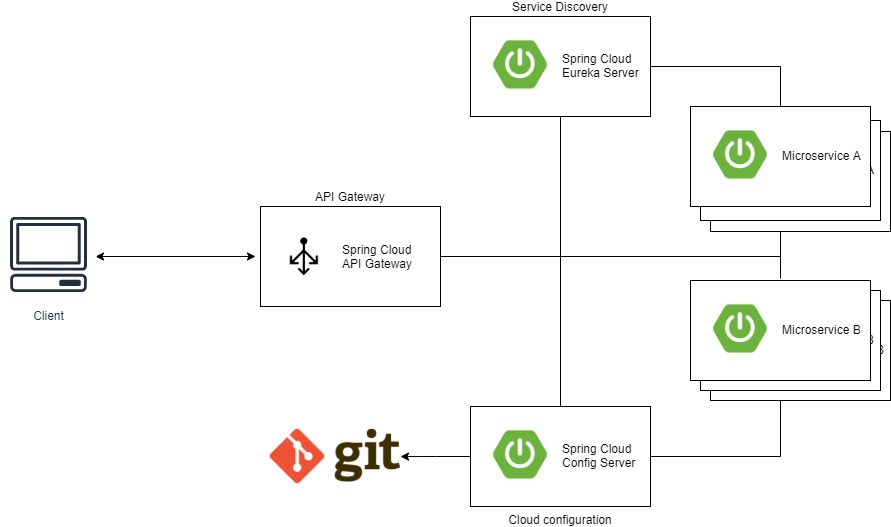
Service Discovery, Microservice 구현하기
오늘 처음으로 해볼것은 서비스 디스커버리와 마이크로서비스에 해당하는
eureka server, eureka client 이다.
기본적인 spring boot의 버전은 2.5.0, jdk version은 11로 설정하였다.
1. eureka server
서비스 디스커버리로서 마이크로서비스를 찾을 수 있게 서비스 라우팅 정보를 가지고 있는 레지스트리 서버이다.
DNS 역할을 한다고 보면 된다.
- 필요한 의존성
dependencies {
	//jdk 11 설정시 유레카 서버의 JAXB 모듈 의존성이 포함되지 않으므로 수동으로 넣어줘야함.
	implementation 'org.glassfish.jaxb:jaxb-runtime'
	implementation 'org.springframework.boot:spring-boot-starter-web'
	implementation 'org.springframework.cloud:spring-cloud-starter-netflix-eureka-server'
	testImplementation 'org.springframework.boot:spring-boot-starter-test'
}- main 클래스에는 @EnableEurekaServer 어노테이션이 포함되어야한다.
- yml 설정
server:
  port: 8761

eureka:
  instance:
    hostname: localhost
    #레지스트리에서 클라이언트로부터 마지막 하트비트를 수신하고 제거 대상이 되는데 걸리는 시간(default:90)
    lease-expiration-duration-in-seconds: 30
  client:
    registerWithEureka: false # 자기 자신을 유레카에 등록하는지의 여부
    fetchRegistry: false
    serviceUrl:
      defaultZone: http://${eureka.instance.hostname}:${server.port}/eureka/
  server:
    #네트워크 단절 등의 이유로 문제가 있어 문제의 instance를 정해진 기간동안 제거하지 않을지의 여부 (default:true)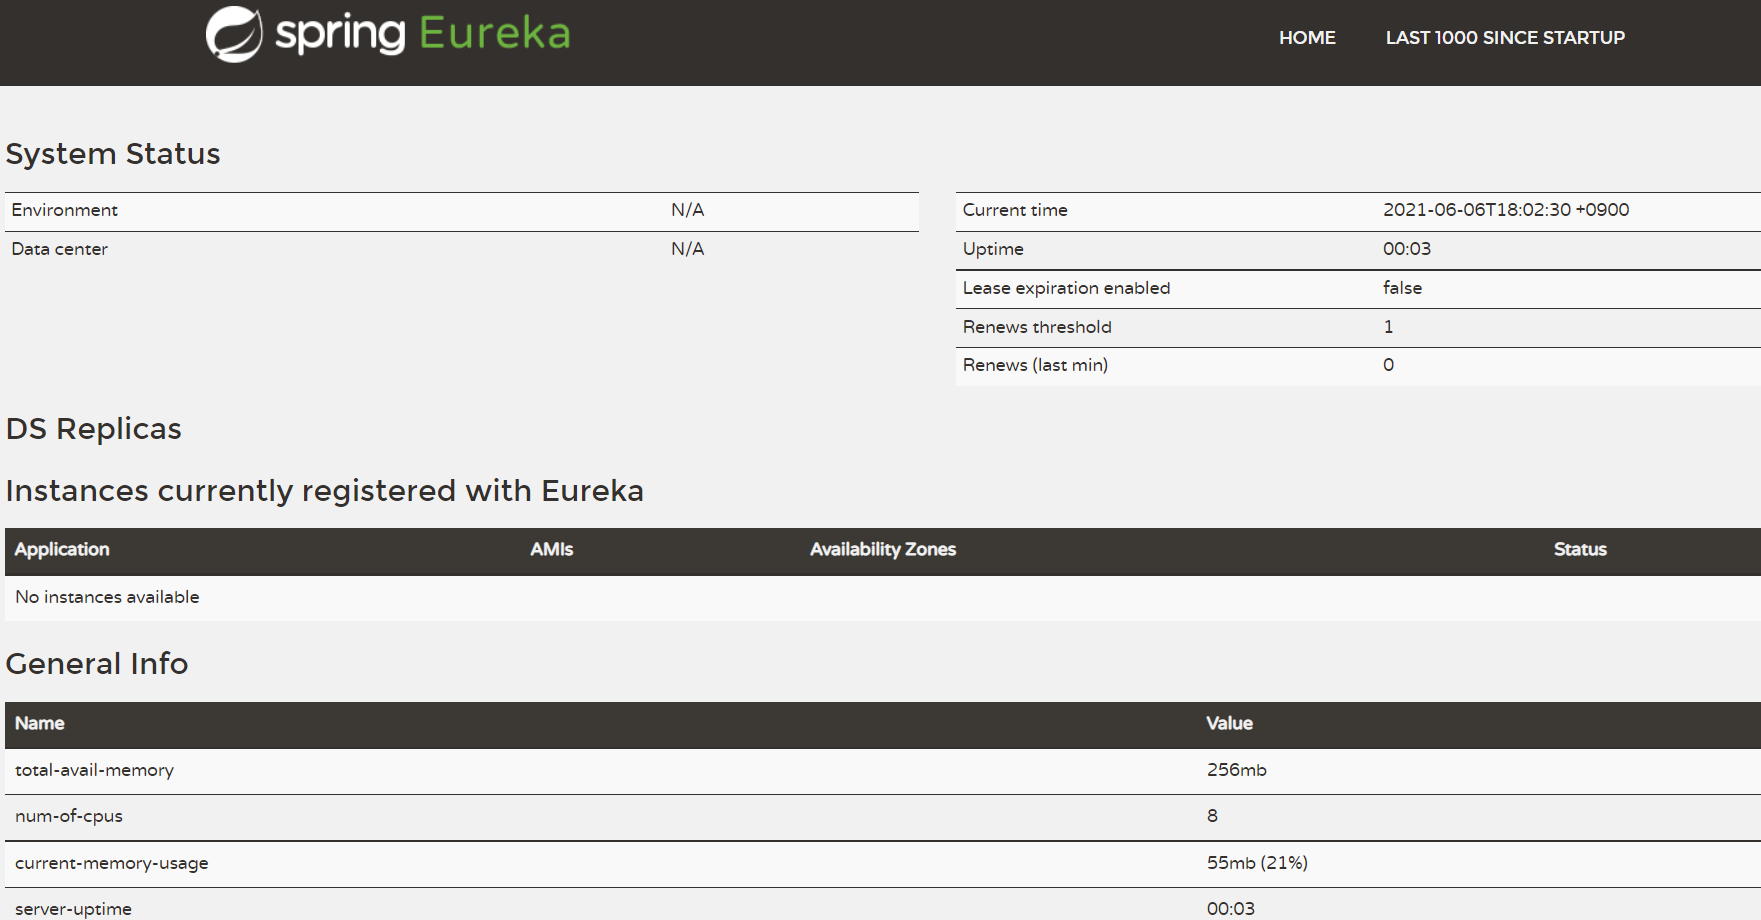
enable-self-preservation: true- localhost의 서버 포트로 접속해보면 다음과 같은 기본적인 유레카 서버의 정보 페이지 나오게 된다.
2. eureka client
클라이언트의 요구사항에 따른 핵심 비즈니스 로직이 담긴 API들이 존재하는 마이크로서비스이다.
- A, B같이 네이밍하여 구현하면 재미가 없으니 물류 관리, 고객이라는 가상의 서비스를 만들어 보았다.
1) SCM Microservice
- 필요한 의존성
dependencies {
	implementation 'org.glassfish.jaxb:jaxb-runtime'
	implementation 'org.springframework.boot:spring-boot-starter-web'
	implementation 'org.springframework.cloud:spring-cloud-starter-netflix-eureka-client'
	testImplementation 'org.springframework.boot:spring-boot-starter-test'
    	//편한 개발을 위한 lombok도 포함
	compileOnly('org.projectlombok:lombok')
	annotationProcessor('org.projectlombok:lombok')
}- yml 설정
server:
  port: 8081

spring:
  application:
    name: scm-service # 유레카 서버에 등록될 서비스의 이름

eureka:
  instance:
  	# 유레카 클라이언트 서비스의 각 인스턴스 id
    instanceId: ${spring.application.name}:${random.value}
    lease-renewal-interval-in-seconds: 10 # discovery한테 (default:30) 10초마다 하트비트 전송
  client:
    register-with-eureka: true # 유레카 서버에 등록
    fetch-registry: true
    service-url:
defaultZone: http://localhost:8761/eureka/ # 유레카 서버 엔드포인트- main 클래스에는 @EnableDiscoveryClient 어노테이션이 포함되어야 한다.
- eureka server를 띄운 상태에서 scm 서비스 인스턴스를 포트를 다르게 해서 두 개 정도를 띄워보면
아까 보았던 유레카 서버 상태 페이지에서 다음의 내용을 확인할 수 있다.

- 마이크로서비스의 이름들과 인스턴스 목록 가져오기 API로 테스트하기
@RestController
public class CommonsController {

  @Autowired
  private DiscoveryClient discoveryClient;

  @GetMapping("/services/all")
  public ResponseEntity<List<String>> getServices(){
    return new ResponseEntity<>(discoveryClient.getServices(), HttpStatus.OK);
  }

  @GetMapping("/{serviceName}/instances")
  public ResponseEntity<List<String>> getInstancesByService(@PathVariable String serviceName){
    return new ResponseEntity<>(discoveryClient.getInstances(serviceName).stream()
      .map(ServiceInstance::getInstanceId).collect(Collectors.toList()), HttpStatus.OK);
  }

}- 각 endpoint로 요청을 날려보면 다음과 같이 나온다.


- 이를 통해 유레카 서버에서 가져온 등록된 클라이언트들의 서비스, 인스턴스 목록을 확인할 수 있으며,
DiscoveryClient 객체를 통해 가져온 서비스와 인스턴스로 직접 API를 호출할 수도 있다.
2) Customer Microservice
- 필요한 의존성은 SCM 서비스와 같음
- yml 설정
server:
  port: 8082

spring:
  application:
    name: customer-service

# 이하 scm yml과 같음.- discoveryClient를 사용하는 예시를 위해 customer 서비스에서 scm 서비스를 호출하는 예시를 작성해보자.
- scm service 코드에 추가
@Getter
@Setter
@AllArgsConstructor
public class Product {

  private String productId;
  private String categoryName;
  private String name;
  private int price;

}

@Getter
public enum Category {

  FRUIT("1234","과일");

  Category(String categoryId, String categoryName){
    this.categoryId = categoryId;
    this.categoryName = categoryName;
  }

  private final String categoryId;
  private final String categoryName;

}

@Getter
@Setter
public class Fruit extends Product {

  @Builder
  public Fruit(String productId, String productName, int price) {
    super(productId, Category.FRUIT.getCategoryName(), productName, price);
  }

  public static List<Product> dummyFruits(){
    return List.of(
        Fruit.builder()
            .productId(UUID.randomUUID().toString())
            .productName("사과")
            .price(12000)
            .build(),
        Fruit.builder()
            .productId(UUID.randomUUID().toString())
            .productName("배")
            .price(20000)
            .build(),
        Fruit.builder()
            .productId(UUID.randomUUID().toString())
            .productName("포도")
            .price(5000)
            .build()
    );
  }

}

@Slf4j
@RestController
public class LogisticsController {

  @GetMapping("/fruits/all")
  public ResponseEntity<List<Product>> allFruits(){
    log.info("Print all fruits.");
    return new ResponseEntity<>(Fruit.dummyFruits(), HttpStatus.OK);
  }

}- customer service 코드에 추가
@Getter
@Setter
@NoArgsConstructor
@AllArgsConstructor
public class Product {

  private String productId;
  private String categoryName;
  private String name;
  private int price;

}

@RestController
public class CustomerController {

  @Autowired
  private DiscoveryClient discoveryClient;

  @PostMapping("/{user}/cart/buy/all")
  private ResponseEntity<String> buyAllProduct(@PathVariable String user) {
    List<ServiceInstance> scmServices = discoveryClient.getInstances("scm-service");

    String buyFruitsUrl = scmServices.get(0).getUri().toString() + "/fruits/all";

    RestTemplate restTemplate = new RestTemplate();
    List<Product> products = restTemplate.exchange(buyFruitsUrl, HttpMethod.GET, null,
        new ParameterizedTypeReference<List<Product>>(){}).getBody();

    String responseMessage = user + "가 " +
        products.stream().map(Product::getName).collect(Collectors.joining(",")) +
        "를 구매했습니다.";

    return new ResponseEntity<>(responseMessage, HttpStatus.OK);
  }
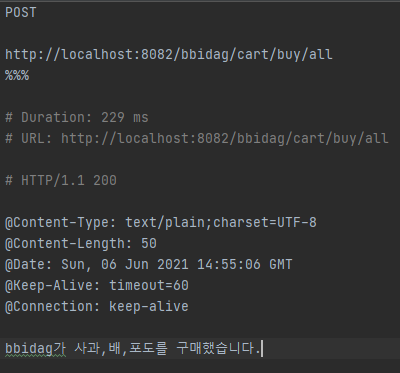
}- 이제 customer microservice app에 API를 호출해보면 scm service의 api 결과를 사용한 결과가 출력된다.
- 이 방법은 다른 서비스를 호출하는 코드가 너무 장황하고, api 사용자마다 로드밸런싱 전략을
자체적으로 구현해야 하는 문제가 있다. - 다른 서비스를 더 간단하게 호출하고 로드밸런싱을 하기 위한 효과적인 방법은
api gateway를 개발할 때 더 자세히 알아보도록 하자.
안전하게 Eureka Client를 종료하기
- 그냥 프로세스를 kill 하거나 서비스를 종료하면 유레카 서버가 해당 인스턴스가 통신이 되지 않아
연결이 끊겼음을 인지하고, 다른 서비스들이 이를 유레카 서버를 통해 서비스 목록을 갱신하는 것이 오래 걸린다. - 유레카 클라이언트에 의존성/설정 추가하기
implementation 'org.springframework.boot:spring-boot-starter-actuator'management:
endpoint:
shutdown:
enabled: true
endpoints:
web:
exposure:
include: "actuator"- actuator를 사용하기 위해서는 제공하는 기능의 endpoint를 위 yml 설정과 같이
활성화(enabled), 노출(exposure)하는 작업이 필요하다. - 설정을 했으면 이제 종료할 인스턴스에 POST 메소드로 /actuator/shutdown 요청을 보내면
유레카 서버 등록 해제, 프로세스 종료가 이뤄지게 된다.
Eureka server HA(high availability) 구성
대규모 서비스를 운영하기 위해서는 서비스의 고가용성을 고려하는 것이 정말 중요하다.
위에서 구현한 유레카 클라이언트들의 경우 인스턴스를 여러개를 띄워서 운영하게 되면,
특정 인스턴스가 죽더라도 나머지 인스턴스들이 살아있기 때문에 서비스가 일부 장애가 있더라도 전체가 죽진 않는다.
근데, 서비스 라우팅을 담당하는 유레카 서버가 죽으면,
라우팅을 사용하는 클라이언트 서비스들이 모두 장애가 발생하게 된다.
유레카 서버 설정
- 유레카 서버를 8761, 8762 포트로 각각 띄운다고 가정하자
- 8761 서버 yml 설정
server:
  port: 8761

eureka:
  client:
    serviceUrl:
      defaultZone: http://localhost:8762/eureka/
- 8762 서버 yml 설정
server:
  port: 8762

eureka:
  client:
    serviceUrl:
      defaultZone: http://localhost:8761/eureka/
- 기존 설정은 동일하게 설정한다.
- 보다시피 서로의 서버를 defaultZone에 설정하면 된다.
유레카 클라이언트 서버 설정
- 유레카 클라이언트 yml은 동일하게 defaultZone을 두 유레카 서버로 콤마단위로 기입하면 된다.
eureka:
  client:
      defaultZone: http://localhost:8761/eureka/,http://localhost:8762/eureka
이렇게 한 상태에서 서버를 각각 띄우게 되면 유레카 서버가 하나가 죽더라도 나머지 살아있는 서버를 통해
클라이언트 정보를 정상적으로 업데이트시킬 수 있는 것을 볼 수 있다.
당연하게도 고가용성을 위한 구성을 하려면 한 물리 서버가 아닌 두 개 이상의 서버에서 각각 띄워서
관리를 해야 된다.
마치며
오늘은 MSA에서 서비스 디스커버리와 마이크로서비스에 해당하는
유레카 서버와 유레카 클라이언트에 대해 구현해보았다.
소스는 다음의 github에서 확인해볼 수 있다.
1. 유레카 서버 - https://github.com/bbidag/spring-cloud-eureka-server
bbidag/spring-cloud-eureka-server
Contribute to bbidag/spring-cloud-eureka-server development by creating an account on GitHub.
github.com
2. Eureka Client
https://github.com/bbidag/spring-cloud-microservice-scm
bbidag/spring-cloud-microservice-scm
Contribute to bbidag/spring-cloud-microservice-scm development by creating an account on GitHub.
github.com
https://github.com/bbidag/spring-cloud-microservice-customer
bbidag/spring-cloud-microservice-customer
Contribute to bbidag/spring-cloud-microservice-customer development by creating an account on GitHub.
github.com
참고자료 출처
- monolithic vs msa (https://jorosjavajams.wordpress.com/characteristics/)
- spring cloud netflix (https://docs.spring.io/spring-cloud-netflix/docs/current/reference/html/)
'개발 > spring' 카테고리의 다른 글
| [Spring] pojo 기반의 설정 객체 사용 방법 (0) | 2024.02.18 |
|---|---|
| [spring] application event 사용해보기 (1) | 2024.02.05 |
| [Spring/MongoDB] MongoDB에 Entity를 저장할 때 필요 없는 필드 제외하기 - 2 (0) | 2021.09.01 |
| [Spring/MongoDB] MongoDB에 Entity를 저장할 때 필요 없는 필드 제외하기 (0) | 2021.06.22 |
| [Spring] @primary 어노테이션 사용시 주의사항 (0) | 2021.05.24 |